November 22, 2010

Crafting Up Christmas with Shutterfly

I am really looking forward to the Holidays. For the last 2 years my hubby and I have sent out photo Christmas Cards (even though its been just the two of us). I really love them, both sending and receiving. All the products Shutterfly offers are really great. I have been using their products for a long time.


I made our honeymoon photo album with them, and just a few weeks ago I sent out our change of address cards that I ordered from them. I am really looking forward to choosing from their Christmas photo cards. There are so many to choose from here are a few of my favorites...


There are so many ways you can use Shutterfly this Holiday Season. Make gifts for your loved ones with their photo albums and calendars, or send holiday cheer with their holiday, Christmas, and Hanukkah cards. Get started now by uploading your photos. If you sign up for their emailing list they will send you all of their latest sales and deals.


~Rachel~

August 19, 2010

Mary Engelbreit Shadow Box for Mom


I think every crafter has a special place in their heart for Mary Engelbreit. My Mother-in-law and her mother have always loved anything and everything Mary Engelbreit. I used to visit teach a sister who's house was honestly ceiling to floor Mary Engelbreit. If you aren't a lover yourself I am sure you know a woman who is.


I came across this photo and I wish I could tell you where I found it. I believe it was on the Mary Engelbreit blog. I couldn't find it on there again though. I really liked it and at the time was trying to think of a gift to give to my Mother-in-law. Here is my version. You could make this for your mother or mother-in-law. You could even change it to say friend or sister to make it work for your Mary Engelbreit enthusiast.


Supplies:
White card stock
Black ribbon 7/8"
Pink felt
Green embroidery floss
3 different shades of green felt
Black felt
Adhesive red felt
Variety of buttons (red, pink, yellow, blue)
Heart buttons
Black bottons
Black and white ribbon
Shadow box
I bought all my supplies at Joann's for about $30 dollars


Start by cutting your white card stock to fit in the shadow box. This tutorial follows an 8.5 x 11 shadow box. Cut 5 pieces of black ribbon in 10 3/4" strips.


Glue or tape ribbon on paper a half inch apart starting from the middle and working your way out. You will want some of it to over lap.


Cut pink felt in a 6 1/4" by 8 1/2" rectangle. Also cut heart out of black felt. Drawn a line with a pencil of where you want to stitch, then stitch along the line.


You can use this as a template. It is also best to have your black felt heart to use as a template so you know where to draw your line for the stitching.


Cut leaves out of green felt. You will need:
20 of green
8 light green
10 dark green


Place the heart on the pink felt, but don't glue. This will allow you to use it as a guide to place the leaves. First place leaves where they will go, then glue one at a time.


This is what it will look like after you glue the leaves down. Isn't it starting to look more like something then just felt and thread?


Now you will trace your lines for stitching on the black heart. I placed my bigger buttons down give me a guide but these can be more random.


Everything is being glued over the top of the stitching.


You can use this template to cut MOM out of red felt.


DO NOT glue MOM on yet but place it on the black heart so you will know where to place the buttons and leaves. The leaves on the heart can be placed depending on how you did your stitching. I started from the bottom placing the leaves and buttons but not gluing them. After everything is placed then you can glue.


I waited to do MOM last. Remove paper to expose adhesive. I also added a little hot glue to make sure it stayed on well.


Now glue the decorated heart to pink felt. Then glue the pink felt to card stock with ribbon on it. Line the pink felt with the black and white ribbon. Also tie a bow with the black and white ribbon and add to top of heart. Glue black buttons and heart buttons to every corner.


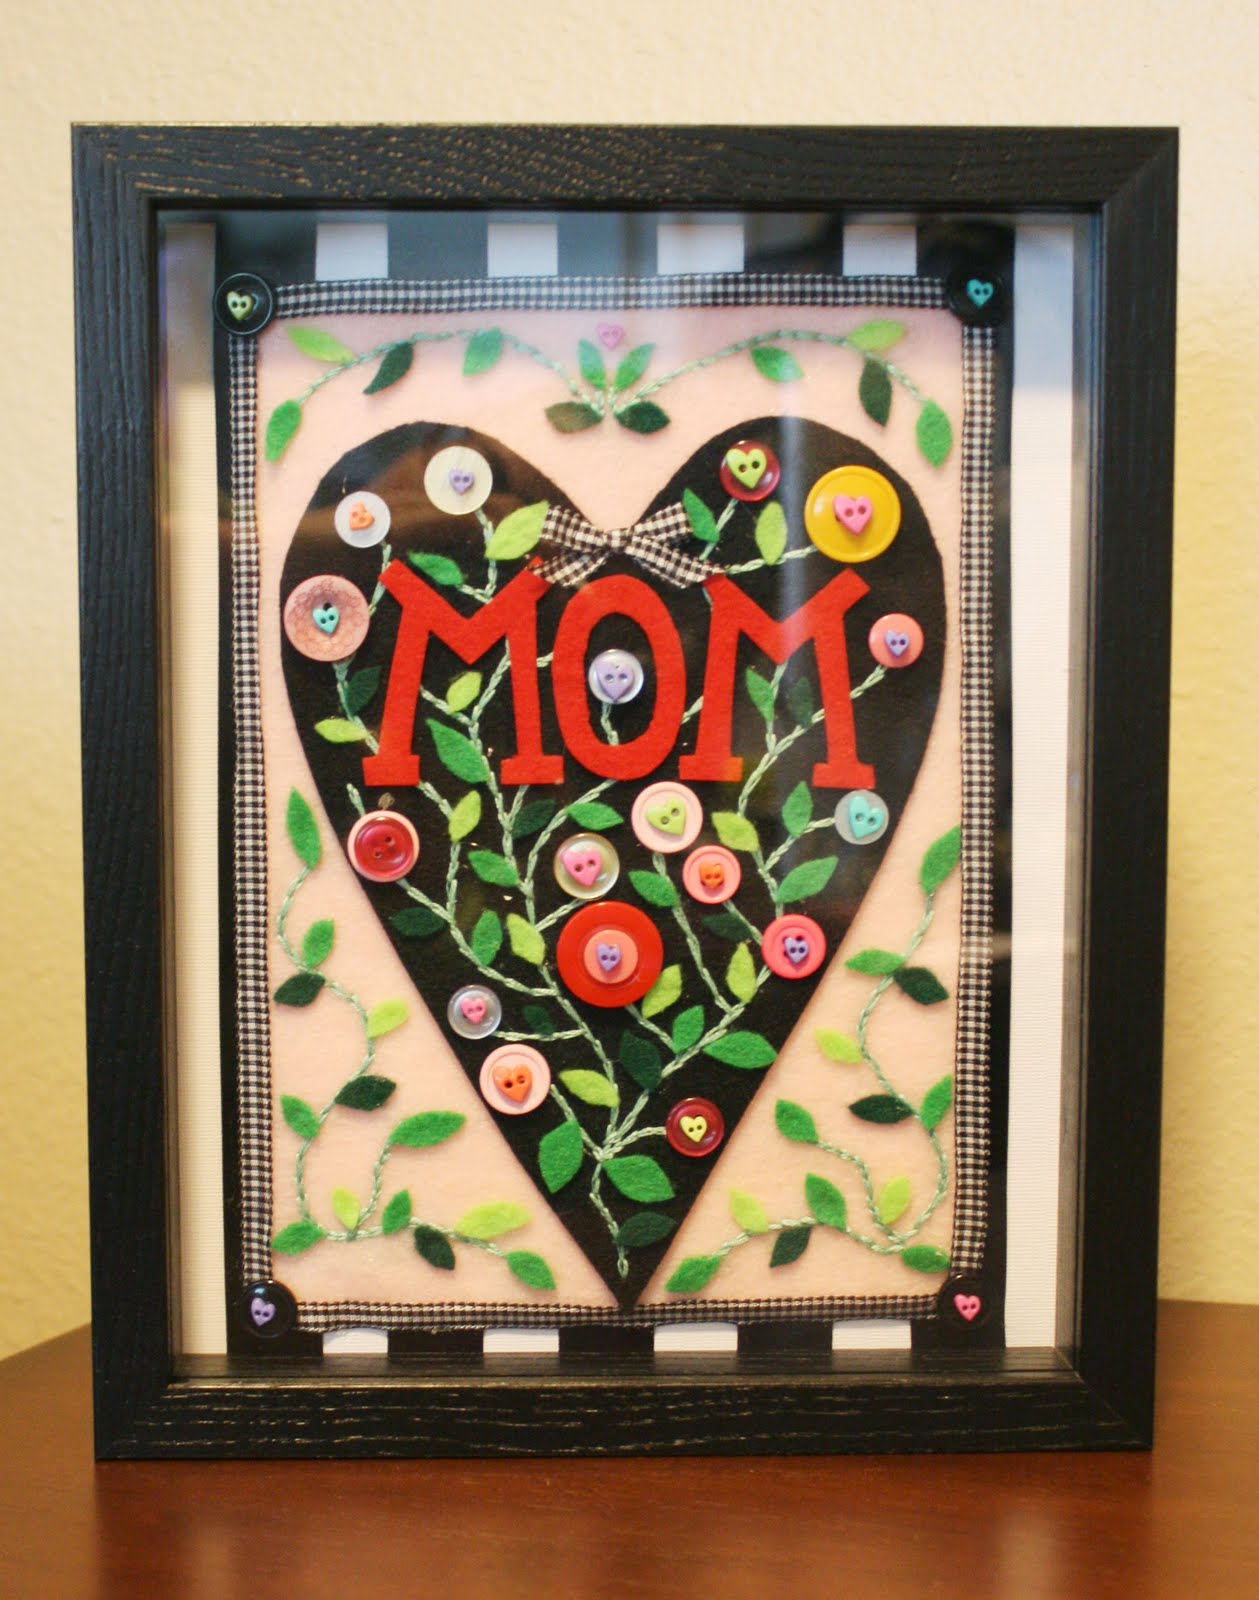
There you have it. It's ready to go in the shadow box.


On a scale of 1 to 10 for love of doing a craft this one gets a 9. I really enjoyed it.


~Rachel~

August 17, 2010

Chocolate Bundt Cake Recipe

This a family favorite. My moms makes it quite often and my cousin in pretty much pro at it. It is great at satisfying a chocolate craving.


Here is a recipe card for your printing pleasure.


Here is the recipe if you just want to copy and paste.


Cake
1 box Devil’s food cake
1 cup or 8 oz. sour cream
5 oz. box instant chocolate pudding
1/2 cup of oil
1/2 cup warm water
4 eggs
6 oz. chocolate chips

Icing
1 stick of butter
4 T. cocoa
6 T. milk
1 pound powered sugar
1 t. vanilla

Cake: Mix all ingredients together in mixing bowl. Pour into greased (using cooking spray) Bundt pan. Bake at 350 degrees for 50 minutes. Allow cake to cool.

Icing: Bring butter, cocoa, and milk to boil. Add vanilla and powdered sugar 1/2 cup at a time while mixing. Mix well until all powdered sugar is dissolved. Pour over cooled cake immediately.


Tips
*Don't use flour when greasing bundt pan or the cake with
have a white coat on it when its done baking.

*Put cake in the freezer to cool faster. 25-35 minutes usuall does the trick.


Please enjoy and let me know how it turns out if you make one.

~Rachel~

August 14, 2010

Fabric Flower Tutorial

I found this fabulous fabric flower tutorial from Crochet & Sweet Simple Things by Dawn. I love it. I was able to do the machine sewing then take the rest and finish on a road trip.

I made this white one for my cousin. Her family was going through the temple and she was getting baptized shortly after.


These I made for my sister for her Birthday. The black and orange one is for Halloween.


What a great tutorial! It was really easy to follow. This is a good beginner sewing project because there is not a lot of fancy machine sewing involved.

I know there are a gazillion tutorials out there for fabric flower tutorials. I would love to know your favorite.

~Rachel~

Leave the link for a fabric flower tutorial you have written or one you have come accross here:

August 10, 2010

Etsy Shop Open for Business

Do Do Doooo (Trumpets Sounding)

Ladies. I present to you, with a high pitched excited voice
Bayberry Creek Crafter's Etsy page.


Some of you may have already noticed that I have changed my left side bar and added my Etsy mini shop. These are the current items I have listed in my shop.


There will be more variety of these bags to come soon.
As well as new products all together. So stay tunned!


~Rachel~

DIY Mouse Pad

My former mouse pad was a photo of the Eiffel tower that I bought at a Target. It had seen better days and I was in need of a new one. I was at Ikea (a store I frequent quit regularly), and same a across a pack of three trivets. You know the things you use to place hot pots and pans on. Well I decided I needed two, but not all three. As I finished my route through the store I brainstormed on what I could use the third for. As I was testing out office chairs I came up with this idea.

Trivet/Cork Mouse Pad


What you need:
-Trivet or Cork cut to 7" circle
-Fabric
-Heat and Bond
-Iron
-Pencil
-Scissors


Start by ironing your fabric so it is wrinkle free. Then cut out a 8x8 piece of heat and bond. Iron that to the wrong side of your fabric following product instructions. Let it cool.


Then using your trivet or round piece of cork trace on to the heat and bond. Trace it as tight, or as close to the cork as possible. Try to make your circle a little smaller than the cork. That way it will not hang over the sides.


Now using scissors cut out your circle. Again try make the fabric smaller than the cork so cut on the inside of the line you traced.


After you have cut out the circle, peel of the paper of the heat and bond. Place the circle on the cork and iron on using product instructions.


After it cools it is ready to use. Mine is on our desk in the office.


This is a quick and easy project. Take a shot at it and if you do I would love to see how it turns out.


~Rachel~

August 7, 2010

Jedi Robe

Pinterest Visitors & Everyone Else:
You can purchase a completed robe or the tutorial for this cute Jedi robe in my Etsy Shop.
They are listed on my side bar. Thanks for visiting! 

How cute is my nephew? He is a huge fan of Star Wars and I wanted to give him something he could use along with all his lightsabers.


It is made out of fleece. I used a t-shirt of his to start with to make sure it was the right size and measured him from shoulder to toe to make sure it was the right length. I also used a jacket of mine as a pattern (kind of) for the hood. I made it a little larger since they are over sized anyways.


I made this tag for gift giving purposes only.
Stars Wars Corp: I am not trying to steal any logos. I promise
:)


Take a go at it. If you would like one and don't feel you have the skills to make one on your own. Please contact me and I would be happy to help.


~Rachel~

August 5, 2010

Refinished Box

My husband and I went to a garage sale on Main Street in Panguitch last year. It was so much fun. All the stores sold things and then donated the money to the Boy Scouts.

We found this box and its been tucked away since then. I decided to give it a face lift and use it on my nightstand to put jewelery in, like my wedding ring and watches that I have worn that day. I have a lot of jewelry boxes, hangers, and holders but can a girl really ever have to many?


I painted it with 2 coats of black paint then 3 coats of white paint. I still need to add a glaze or sealer. I added the flower pattern felt on the inside, its my favorite part of the box. Once my room is clean and free of boxes I will share a photo of where it has found its home.


What have you refinished that you just love?


~Rachel~

August 3, 2010

Family Checkers

Here is an idea for a gift for any occasion and any age. A customized checkers board game with playing pieces for each member of the family. This was a really fun and easy project!


What you need:
-Unfinished round wooden disks 12 for each person (I found mine at Joann's)
-1-2 sheets of Patterned scrapbook paper
-Solid scrapbook paper
-Board (An old game board is perfect, try the thrift store)
-Paint (the number of colors depends on the number of people)
-Box (if you use an old board game the same box is perfect)
-Mod Podge
-Names and Crowns printed


Start by painting your board with any color of your choice. Depending on the original color of the board you may need 2 coats. While that is drying paint your wooden disks. I used a separate color for each family member and had it coordinate with the patterned paper. You could use one color for all of them. These will need 2-3 coats of paint.


After the board is dry place your patterned paper on to see how how much you will need. I had to use 2 pieces and match them up to not leave a noticeable seam. After you measure and cut your paper to the proper length you will Mod Podge it on. Apply Mod Podge to a section of the paper and place it on the board. Make sure it is in the right place and use a ruler or other long tool to prevent air bubbles. Repeat until it is all glued down.


Next you will need to mark your places for solid pieces. Your board will need to be 8 squares by 8 square. Here is where you need to use your math skills. You will need to figure out how long each side is and divide that by 8. So if your board is 14 x 12 each square will need to be 1.75 x 1.5. Mark the board according to its size so you know where to place each piece. Cut your solid paper to the right size. You will need 32 squares/rectangles. Glue them down using Mod Podge.

After everthing is dry apply a coat of Mod Podge to the top sealing everything.


Now to finish your disks. After they are dry cut out the printed names and crowns using scissors or a circle punch. I recommend a circle punch it makes things much easier. Apply the names on one side and the crowns on the other using the same technique as with the board. Mod Podge the paper then place on disk and use tool to get rid of air bubbles. Apply a top coat to seal.

To finish it off you can decorate your box. I used Mod Podge to apply this paper to my box.


*Variation: Use photos of the family members instead of their names to attach to the playing pieces.

Have fun with this project!!


~Rachel~

August 2, 2010

July 31, 2010

Recycled Pringles Can-Cookie Holder

Remember that recipe for the delicous cookies? Well here is an alternative to giving cookies to your friends, families and neighbors on a plate.

I love to recycle containers. There are so many uses for a Pringles container here is just one.


I had a lot of fun making these!

What you need:
-Pringles Can
-Printed paper
-Coordinating solid paper
-2 colors of ribbon (3/8" & 5/8")
-Embellishment (flower, bow, etc.)
-Printed or stamped tag
-Hole punch
-Scizzors & paper cutter
-Adhesive


Clean out your Pringles can. I used the spray dust remover to get the crumbs out and a wet paper towel with a little soap.

Measure your printed paper and solid paper by wrapping it around the can to see where you want to cut it. Mark it & cut it. Then glue it to the can. At the seem where the 2 papers meet glue ribbon (either 3/8" or 5/8").

Glue embellishment and tag close to the ribbon, making sure the paper seem down length of the can is in the back.

Using hole punch, punch 2 holes on top making sure they will be on the sides when the can is facing front. Using 5/8" ribbon insert one end in hole, wait to cut it, and tie a knot on the inside of the can. You may have to tie it twice to make it large enough so it doesn't come out. Now cut the ribbon leaving about 3 inches or slack. This will make it easier to tie the other side.

Now for the final touches. Glue 3/8" ribbon around the edge of the lid. Cut the printed paper in a circle cutter. I have a circle cutter than I use but if you don't you can use the lid as a template. Glue that to the top of the lid.

Tada! Now you have a cute canister for cookies or anyother treat.


I gave this one to a friend for her birthday.


These other 2 I gave to the women I visit teach.
I really like the felt flower on this one. I used a template from Craft Gossip.


I really like the colors of this one. It is very bayberry creek Crafter colors :)
I am not in love with the bow I did and if I did it over I would make it smaller.


** Make sure when you make your cookies you make them the right size to fit in the canister**


~Rachel~
Related Posts with Thumbnails